

When my computer starts getting sluggish, the following are all the steps I take to try to clean up my computer a bit.
These are not really in any particular order - Just as I think of them. PLEASE READ ALL THE WAY THROUGH BEFORE DOING ANY OF THESE STEPS.
Clearing out your temp files and more,
Go to Start -- Control Panel -- Select Internet Options.
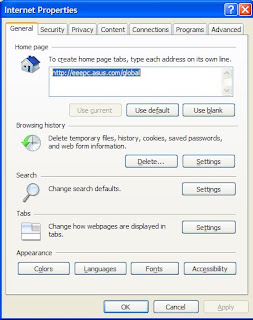
You should already be under the General tab. In the middle of the window, you'll see Browsing History. Select Delete (this will delete all of your temporary files the internet creates, your browsing history, cookies that websites save and store on your computer, saved passwords, and web form information.) Another window will pop up that will let you select exactly which ones you want to delete. ONLY select Delete All IF YOU ARE THE KIND THAT CAN REMEMBER ALL OF YOUR ALREADY INPUT USER NAMES/PASSWORDS - otherwise this will delete them all. Most sites though have the FORGOT PASSWORD option but then again you have to keep up with security question answers and so on and so on. So again ONLY DO THIS IF YOU ARE SURE. This only really frees up a little room on your computer (not so much though that if you are unsure about doing it, you don't really NEED to).
What I do is keep a master document of all of my websites, user names and passwords. The best place to keep this master file would either be on an external device (recommended for the safest like an external hard drive) or on a workspace website if you need to be able to access it while away from your coputer (like at work or some where els).
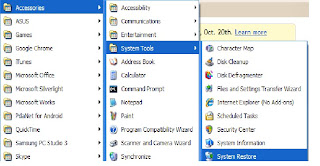
Before we go to the next step, we are going to create a restore point. So if anything is done that you need to un-do, you can. Go to Start and select All Programs, then select Accessories then select System Tool, then System Restore.
You will see this screen:
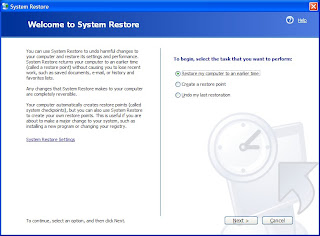
Select the second option called Create A Restore Point. Select Next at the bottom. On the next screen you will be asked to give this restore point a name. Note that the time and date are already going to be added in with this name automatically, so name it something easy to identify and remember. Then select Create.
To get to this restore point again if needed, open the System Restore the same way as in the beginning of this part. Then select the first option called Restore my computer to an earlier time. Select Next. On the calendar, you can only restore back to a date that is bold. Go to the date when you created the restore point then select the one you named in the list on the right hand side. Select Next.
Your computer will then go through a shut down cycle and restart. When the restore point is completed, the System Restore window will appear at startup. Select Done or Finish and close the window. All your changes you made before the restore point should be reversed. This does NOT undelete files you have deleted. It only reverses programs and update changes you have made.
Removing unused programs
Go to Start and select Control Panel then select Add/Remove Programs. It will take a few minutes or so to open this saying "Please wait while the list is being populated" (depending on how many programs you have installed on your computer). Go through and uninstall any programs you no longer use. DO NOT DELETE ANYTHING YOU ARE UNSURE OF WHAT IT IS. THERE ARE A LOT OF UPDATES IN THIS FILE THAT MICROSOFT HAS UPDATED TO. Only uninstall programs you know of.
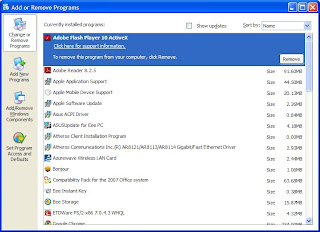
When you find a program you want to uninstall from your computer, click on the Remove button on the right side of the selected program. Go through the on screen prompts.
Disk Cleanup
This is a tool that enables you to clear your disk of unnecessary files. This is similar to the step of going into the Internet Options but with a few extra options.
Go to Start, Accessories, System Tool then select Disk Cleanup. The first window that appears asks you which disk you want to clean up. Select the desired disk drive.
For most personal home PCs, you will want to select the C: drive. The next window you will see will be calculating the estimated amount of space it will be able to free up for you and it will take a little time depending on the size of your drive and how much you have stored on it.
The next window you will see when that is done is as follows:
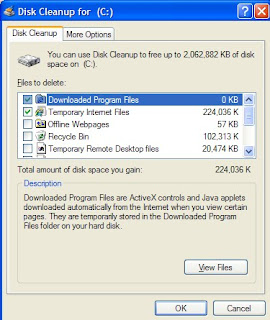
On this window, you can pick and choose the files you want to delete and it will show you a total of the space you will gain by deleting those files. You can read a description of what each category is. You can also view more files in detail by selecting the View Files option. After you have selected the desired files to delete, select OK.
The More Options tab at the top lets you do a few more things as well. One of the options is Windows Components. This lets you remove certain components of windows that you dont use. I usually never mess with this part. The next one is the previously taken step of deleting programs you no longer use. So if you took that step, this option is not necessary at this point now. But now you see another way of getting into it. The last option is for the System Restore. This is not to DO a system Restore like previously explained, this is to delete OLD restore points you no longer need because you have created more recent ones. DO NOT DELETE ALL OF THE RESTORE POINTS WITHOUT CREATING A RECENT ONE (see above step on how to create a restore point)
Disk Defragmenter
This is, if not, THE most IMPORTANT one of these steps you will take in cleaning up your computer as well as it will make it run faster.
Go to Start, Accessories, System Tool then select Disk Defragementer. You will see this window:
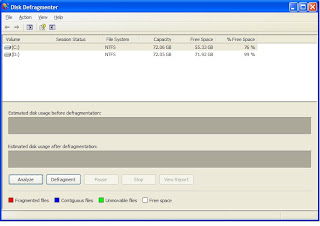
When you install and uninstall programs, files, etc on your computer, pieces get strung out in parts all over your computer and are not always together as they should be. This helps take all those pieces and put them back together like a puzzle. You can select Analyze to see on the grid how it will change after you Defrag. Analyzing is not that neccessary. So go ahead and just select to Defrag. When yours shows you the grid, at the bottom you will see the different color keys as to what the different colors represent. This tool can take a while depedning on the size it is working with and how much it has to work with. Do this at night before you got o bed because you really dont want to do much else while this is working, because it can mess the process up as far as not getting all the peieces correctly and also make being on your computer a slug fest.

There is also a really good FREE defraging program called Defraggler.
Download it HERE. It is by Piriform.
There is also another program good for cleaning out your computer:
 CCleaner is the number-one tool for cleaning your Windows PC. It protects your privacy online and makes your computer faster and more secure.
Download it HERE. It is also by Piriform.
Registry Cleaner
This is really needed to ensure getting rid of broken, old and misplaced registries. There are a few GOOD FREE ones out there you can use. I recommend either Registry Mechanic by PC Tolls or Eusing.
Run the WINDOWS UPDATE
This can be found HERE.
You should be able to also find it under START --> ALL PROGRAMS --> then above the Accessories folder toward the very top of the pop out window that shows all your programs, you should see Windows Updates, which will bring you to the same screen as the above link.
Automatic Updating
Automatic Updates. To turn on Automatic Updates:
- Click Start, and then click Control Panel.
- Depending on which Control Panel view you use, Classic or Category, do one of the following:
- Click System, and then click the Automatic Updates tab.
- Click Performance and Maintenance, click System, and then click the Automatic Updates tab.
- Click the option that you want. Make sure Automatic Updates is not turned off.
Anti Virus Program

I use AVG - Open whatever program you use. Update it and run a FULL system scan.
You can download the FREE version of AVG HERE. Follow the on screen prompts. I also have a post about AVG here.

Extra Protection
Malware, spyware, adware, what is it all?
SPYWARE - computer software that obtains information from a user's computer without the user's knowledge or consent
Malware, spyware, adware, what is it all?
SPYWARE - computer software that obtains information from a user's computer without the user's knowledge or consent
ADWARE - A form of spyware that collects information about the user in order to display advertisements in the Web browse
MALWARE - is short for malicious software, and is designed to secretly access a computer system without the owner's informed consent.
I use Spybot Search & Destroy FREE program. You can download it HERE. Follow the on screen prompts. After this installs, make sure it is all up to date and run a full system scan.
You do not need to have a spyware AND an adware program installed on your computer but it is not a problem to have one of each either. If you want an adware program also, Lavasoft's Adware is a good one I have used in the past as well. Download HERE.
The above two programs will take care of covering all unwanted 'ware' on your computer.
Cleaning The Inside
Turn off and unplug everything from your computer tower. You will need a can of the air spray duster. Take your computer outside (unless you want dust flying every where in your house). Open the case and blow out all those dust bunnies. Make sure to keep the can upright as you do not want the actual condensation from tilting the can to get inside your computer. DO NOT touch any part of the mother board (or ANYTHING inside the computer for that matter) with your hands. DO NOT unplug or mess with anything inside of the computer that you do not know what it is.
There are a LOT of hiding places where dust can clog. Cleaning this out will help keep your fan running smoothly so avoid your computer from over heating.
Clean your Mouse and Keyboard
This is also an important step to take in cleaning your computer - This is usually ALL most people do and go sometimes with NEVER ever cleaning the inside of their computer as at all!!
Use a can of the air duster to clean both. A laser optical muse does not need to be cleaned like one with a roller ball.
A roller ball mouse - turn the mouse over and you will see a round cap, twist it off and take the rubberized ball out. You will then see a few rollers which may have dust wrapped around them, take your finger/fingernail/tweezers/toothpick (something with a point) to help clean the dust off of these rollers. Use the air duster can also.
Keyboard - turn the keyboard upside down over a trash can a lightly tap it on the bask to get the loose particles that may have fallen inside it - then use the can air duster to blow out the remaining debris and dust.
After all of these steps, your computer should be running much quicker and faster due to more free space and defragmenting your disk drive(s).
Thanks for reading and hope this has helped you.
Evin Leigh
I'm using AVG security for a few years, I'd recommend this product to all you.
ReplyDelete