

How do you keep notes. On a piece of paper stuck in your pocket? Maybe you have some kind of pocket organizer book that you write everything in. Or do you use a program on your computer like Word or Notepad? THIS is the program for the note takers out there. This program is like having a subject divider spiral notebook - with as many notebooks as you want. It lets you keep any and all kinds of information organized neatly.
When you open OneNote for the first time, you will already be in the guide called OneNote 2007 Guide. This can be found under My Documents - OneNote Notebooks - then OneNote 2007 Guide. This explains the basics like I am going to.
You have your notebooks section on the left side of the screen, the subject divider at the top and the pages on the right side.
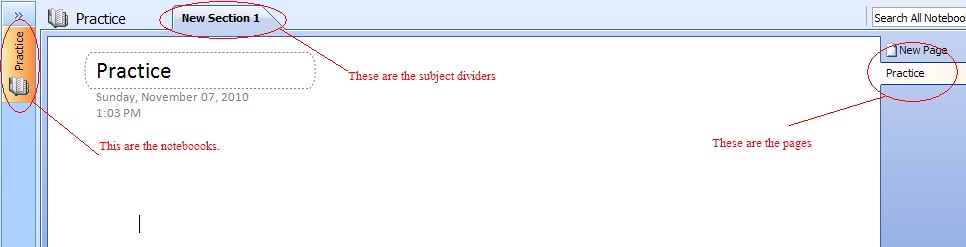
The above pictures shows the layout. You can change this layout to accommodate how you would like it by going to TOOLS -> OPTIONS -> DISPLAY tab (first one) -> then under Display there are three options you can choose from that deal with the position of those three items, Play around with them to see what feels and looks best for you to work with.

You can have as many of each notebook, dividers and pages as you want. This program can be used for many, MANY things like
- For school, using it in your different classes, rather than carrying around notebooks to go with the thick books you already carry - now you just need this program on your laptop. The otebook name could be History. A divider name could be 1800s, and A page name could be 1845. Each page can ALSO have a sub page as well.
- Or you can use it for taking notes in a work meeting by recording the meeting, typing notes, and if there's a presentation you can video record it.
- Or for collecting info from the internet for a research project you are working on.
Here I am going to show you an example of a screen clipping you can do - Now this is NOT your NORMAL screenshot of either the entire window or the entire screen (like the pictures in these posts are screenshots) - This you can pick EXACTLY what portion of the screen you want to copy called a screen clip.
I am going to the Google search page as my example. To take a screenshot, put your mouse curor exactly in the working area in OneNote you want the screenshot to be placed at, go up to INSERT - then down to Screen Clipping.

You will then automatically be taken to last place you were before you went into OneNote - Insert - Screen Clipping. The screen will turn a transparent foggy looking white. Draw a aquare around all the info you want to clip out.
This option will place the clipping directly into the OneNote part you are working on - where you placed your cursor.
OR you can use the key combination of the windows key plus the S key. This option will place the clipping in an unfiled notes section located at the bottom left hand corner - looks like this:

Here you will find ALL your screen clippings from using the Windows Logo key and the S key. You will also see on the right side under pages, each screen clipping will gets it's own page, You can copy, cut, then paste them any where you want. Also each time you use this key combination method, a new window will open. Each window will be updated automatically and have all the new clippings in each one so you do NOT have to leave each window open. You can close them all down to just one. Also notice there is no Save button. The program automatically keeps itself updated and saved (kewl huh?). There is only a save as button if you are like starting a new notebook or if you want to save something in it's own place separately.
A regular screenshot would look like this - of just the window you are working in (alt plus print screen key)

OR of the entire screen (just the print screen key)

The difference is that the second one you can see all the task bar (with the clock) at the bottom, the first one just shows the current screen you are in at the time you do the screen shot.
Well I just want a screenshot of the Google logo without having to go into a program to cut out what all I don't want around the Google logo, which would take a lot longer than to do what I am about to.
This is what I get after inserting a screen clipping.

Now I will Google search cats under images and screen clip a few of them out that I like. This is what my results looks like:

Now I just want the first and last on the first row.
I will get these two clippings out of the

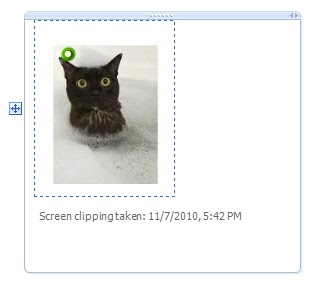
You will notice that each screen clipping you take will have the date and time you did it. If you are needing a website added in so you can go back into it, copy the web address and insert it into the clipping you took.
If you notice when you hover your mouse cursor over any of the clippings, you will see it makes a few boxes around it as so
Notice also that as you move your mouse around in that box, the little box on the left outside of those boxes moves with your mouse cursor. If you gab that little box, you can move the item it is next around to re-arrange the screen clipping look

It can be moved OUTSIDE of the box as well, either into another clip OR any other space you want.
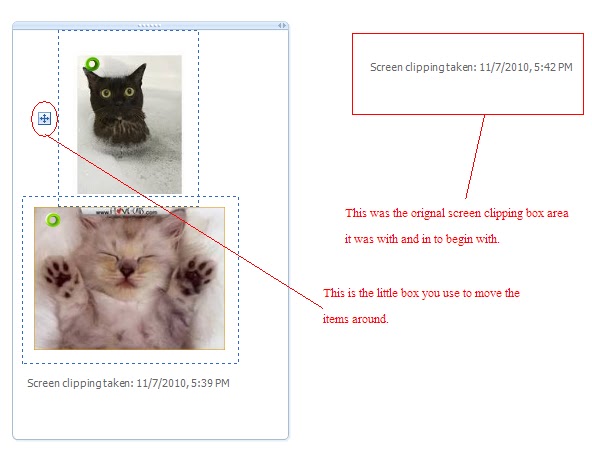
The thicker blue bar at the top of the box around the item, notice if you haver over it, your mouse will change into a four way arrow which indicates you can move the entire box instead of just one item out of the box.

You can also draw a box around mulitple items to move them all together at once rather than one by one.
 |
| From a different space I was working on. |
Now I am going to add a map to this notebook. I will look up the DFW Airport. This is the screen I see on my screen:

Well I really don't need all of this screen and only want the area map right around the airport. So I cut it out to look like this:

Another thing I added was....
I was watching Kill Bill Vol 2 and was wondering what a certian song was playing in the movie. So I searched it and wanted to remember, so I did a screen clipping. After rearranging everything, my ending looks as follows

You may notice that the screen clipping sometimes looks smaller than the original screen clipping was, and you want or need it to be the same size or bigger (or smaller even). Hover your mouse over the right side of the clip on the box edge, and you will see your cursor turn into a double sided arrow. Click and drag until the size you want it. But if you are making it bigger, you will notice, once it gets to its original size, it will no longer get any bigger.
So as you see, this is different than taking a screen shot, this is a screen clipping. And this keeps the layout as shown on what ever website or place you take it from. Screen clips do NOT have to just be from the web. Anything you can see on your screen is the same things it will clip for you. May be you want a clipping of a picture in your photo album to remind you of something. Open up where the picture is at in your computer, then screen clip it and viola!!
There is an unlimited amount of possibilities and things you can do with this program!
ENJOY!
(More features of OneNote soon to come)
0 comments:
Post a Comment
Comments...